Python AWS Lambda Monorepo — Part 2: Custom Package Sharing

In Part 1 of this series, we looked into setting up our project and integrating GitHub, CircleCI and AWS. Now we will work on our application logic and how to reuse our code across different Lambda functions. In this part of the series we will use the following tools:
- Python 3.7
- bash 5.0 (terminal shell)
- pip 19.3.1
- make 3.81
We are developing our function logic in Python 3.7. For our terminal, bash is our shell of choice (Windows users, one option is to use a tool like Git Bash or Cygwin to use bash the terminal tools). pip is the terminal tool used to install Python packages. make is a build and automation tool which allows us to automate commands run via the terminal.
We won’t go over every line of code. Instead, we are focusing on our approach, note-worthy implementation details, and overall project pattern. All the code can be downloaded on GitHub: https://github.com/bombillazo/python-lambda-monorepo

Let’s get this moveable feast underway.
Custom Python Package
Modules
Let’s pause for a moment to review some Python concepts: modules and packages. A module is a Python file containing functions, classes and/or statements definitions that relate logically. In reality, any Python file can be used as a module. Modules are added to our code by using the import statement followed by the name of the module .py file. The Python interpreter looks for modules in the following locations:
- Built-in Python modules
- The directory where the file is being run (and its subdirectories)
- The directories specified by the
PYTHONPATHenv variable - The dependency installations directory
Let’s take an example module.
# example.py
def greet(name):
  print(f'Hello {name}')
We can import it in two ways:
# import1.py
import example
example.greet('Snake')
>> Hello Snake# import2.py
from example import greet
greet('Otacon')
>> Hello Otacon
Using from, we can import our module’s resource directly to our code namespace. Without it, we must use the module name to reference the resource we want.
Packages
A package is a grouping of modules in a directory with a specified hierarchy. A package can contain a single module or multiple sub-modules and sub-packages. Say we have the following example package and python scripts:
.
├── /my_package
|   └── example.py
├── import1.py
├── import2.py
├── import3.py
├── import4.py
...
We can import the package in various ways using dot notation. Also, note the use of the as statement which allows us to give our import an alternate name for use in our logic.
# import1.py
from my_package import example
example.greet('Leonardo')
>> Hello Leonardo# import2.py
from my_package.example
import greetgreet('Donatello')
>> Hello Donatello# import3.py
import my_package.example as pkg
pkg.greet('Michelangelo')
>> Hello Michelangelo# import4.py
from my_package import example as pkg
pkg.greet('Raphael')
>> Hello Raphael
This all works, but we are missing an important file to make this a true package: the __init__.py file. This special file is required to tell the Python interpreter that the directory where this file exists is a Python package. It can remain empty or can be used to execute initialization code and imports for our package. For example, if the following__init__.py file is added:
.
├── /my_package
|   ├── __init__.py
|   └── example.py
├── import1.py
...# __init__.py
import my_package.example
print(f'Package name: {__name__}')
for x in range(2):
  print(x)
The script code would look like this:
# import1.py
import my_package
my_package.example.greet('Lord Vader')
>> Package name: my_package
>> 0
>> 1
>> Hello Lord Vader
Two main things changed. First, importing is simplified in our code since the specific module import is done in the __init__.py file. This is very useful when a package has multiple modules or sub-packages. Second, upon importing, the initialization code in the __init__.py file runs. In this case, it prints the package name and prints a looping value.
If we want to make our package installable using pip, it also needs a setup.py file. The setup file contains package metadata and information used during the building, distribution, and installation of a package (more on distributing Python modules). The script uses a package like setuptools or distutils to call a setup function. This function takes in the package information and setup options as parameters. We will be using setuptools. Here is an example setup script.
.
├── /my_package
|   ├── __init__.py
|   ├── setup.py
|   └── example.py
...# setup.py
import setuptoolssetuptools.setup(
  name = "my_package",
  version = "0.0.1",
  author = "@bombillazo",
  author_email = "example@bombillazo.com",
  description = ("Brief description of my_package"),
  license = "MIT",
  scripts=['example.py'],
  python_requires=">=3.7",
)
By running the python setup.py build command in the directory with the setup file we can build our module or packages:
.
├── /my_package
|   ├── build
|   |   └── scripts-3.7
|   |       └── example.py
|   ├── __init__.py
|   ├── setup.py
|   └── example.py
...
Custom Package
Now that we know the basics of how modules and packages work, let’s create our own. Start by creating the packages directory inside our root project folder:
.
└── /packages
This directory will contain our custom Python packages, in our case the dinosaur package. Inside this directory, we’ll create new files in the following structure:
.
├── /packages
|   └── /dinosaur
|       ├── /dinosaur
|       |   ├── __init__.py
|       |   └── core.py
|       └── setup.py
...
Wait, why the double dinosaur directories? Whenpip installs a package it dumps the package files directly to the installation target location. By creating a package within a package, pip will dump our inner package instead, harboring our modules inside. This keeps our dependency directory cleaner. It’ll make sense when we use pip to install our Lambda function dependencies later on.
This package has a pretty simple setup.py file. One new part we added to it was the packages parameter, which uses the find_packages function part of setuptools to automatically detect packaged within the package.
...
packages=setuptools.find_packages(),
...
In the __init__.py file, we import the main Dinosaur class:
# __init__.py
from dinosaur.core import Dinosaur
The core.py script contains our Dinosaur class with a constructor and the implementation of methods to calculate some attributes and actions to fight.
Up next are the Lambda functions. We have 3 lambda functions in our app. All these functions use the boto3 package as well as our custom dinosaur package. boto3 is the AWS SDK for Python used to execute AWS actions via code.
Each function should have a directory named the same as the Lambda function. We’ll have a top-level directory named services to hold each of the Lambda function’s directories. This is the core of our monorepo.
.
├── /packages
├── /services
|   ├── /create_dinosaur
|   ├── /create_hybrid_dinosaur
|   └── /fight_dinosaur
...
Let’s get into each function starting with create_dinosaur. We’ll add two files: main.py and requirements.txt.
.
├── /packages
├── /services
|   ├── /create_dinosaur
|   |   ├── main.py
|   |   └── requirements.txt
|   ...
...
The requirements.txt should contain the list of packages that our Lambda function needs to run. The file is used by pip to install those dependencies. We don't need to add boto3 to this file since the AWS Lambda environment already provides the package. We will only add our custom package.
# requirements.txt
./packages/dinosaur
Note: The package path is defined relative to the root directory of the project
The main.py file of each Lambda function contains the code to be uploaded and executed by Lambda. create_dinosaur takes in dinosaur parameters from a user via the event object. A new Dinosaur object is created with these parameters. Finally, the dinosaur and its attributes are stored in the dinosaurs DynamoDB table.
To use our Dinosaur class, we use the import statement in all the Lambda functions.
from dinosaur import Dinosaur...new_dinosaur = Dinosaur(
  name=dino_name,
  diet=dino_diet,
  period=dino_period,
  weight=dino_weight,
  armor=dino_armor,
  hybrid=dino_hybrid
)
Using boto3 we can interface with DynamoDB.
dynamodb = boto3.resource('dynamodb')
dinosaurs_table = dynamodb.Table('dinosaurs')...response = dinosaurs_table.put_item(
  Item={
    'name': new_dinosaur.name,
    'diet': new_dinosaur.diet,
    'period': new_dinosaur.period,
    'attack': new_dinosaur.attack,
    'defense': new_dinosaur.defense,
    'life': new_dinosaur.life,
    'info': {
      'weight': new_dinosaur.weight,
      'armor': new_dinosaur.armor,
      'nature': new_dinosaur.nature,
      'hybrid': new_dinosaur.hybrid
    }
  }
)
Moving to the next function, create_hybrid_dinosaur. In the case of this function users don't pass data to the function. The function will select two random dinosaurs stored in our table and run some logic to randomize and merge attributes from both dinosaurs to form a new one. Once the attributes are generated a new Dinosaur object is instantiated and its attributes are stored in DynamoDB.
In DynamoDB we can use both query and scan. Scan will search through the entire table and filter data after going through all. Query will use the primary key values to filter data. We scan to get the random dinosaurs and query when we want to search for a specific dinosaur.
dinosaur_list = dinosaurs_table.scan(
  FilterExpression=Attr('info.hybrid').eq(False),
  ProjectionExpression='#name',
  ExpressionAttributeNames={ '#name': 'name' }
)['Items']...dino_1 = dinosaurs_table.query(
   KeyConditionExpression=Key('name').eq(dinosaur_pair[0]['name'])
)['Items'][0]
Finally, the fight_dinosaurs function. This function also searches for two random dinosaurs; one carnivore and one herbivore. It loads the data into two dinosaur objects and starts THE HUNT: a turn-based, RPG style battle sequence. The function prints out the progress of the fight as each dinosaur take turns attacking. THE HUNT ends when one dinosaur’s life points reach 0.
Custom Package Install
We set up our Lambda functions save for one important part: our Lambda functions are missing the dinosaur package. Remember how Python looks for modules? Our dinosaur package is not in any of those locations. We need a way to distribute our custom package to each lambda.
Enter make! This terminal tool runs commands defined in what is called a Makefile. In the Makefile we code our automation commands using bash script language. We are essentially building a collection of bash scripts and making them callable and reusable with make.
Add a Makefile file in the root directory:
.
├── /packages
├── /services
└── Makefile
We will add the command install-packages to the Makefile. This command will install a Lambda function’s dependencies. It is executed by running make from the terminal in the following manner:
make install-packages LAMBDA=function_nameNote: We will run all our terminal commands from the project root directory unless specified otherwise
This is the code for the install-package command:
#Makefile
install-packages:
  FILE=services/${LAMBDA}/requirements.txt; \
  if [[ -f "$$FILE" ]]; then \
    pip install -r $$FILE --target services/${LAMBDA}/packages/ --find-links ./packages --upgrade; \
  fi
Note: By default
makeruns each line as independent processes one after another. So theFILEvariable we use in the first line would not be usable in the other parts of the script. By adding; \to the end, we’re essentially concatenating each line with the backslash and separating each script command with the semicolon. It’s telling make that all those lines should be executed in the same process shell.Also note the
$and$$signs preceding variables. Bothmakeandbasheach use single dollar signs to identify variables. To remove ambiguity inside aMakefile,$is used formakevariables and$$is used forbashvariables.
Let’s go over the install-packages command. First, we assign the requirements.txt file to a variable. Note the ${LAMBDA} variable, this value comes from the LAMBDA parameter passed when running the make command. Then we check if the file exists. If the file exists, we execute the following:
pip install -r $$FILE --target services/${LAMBDA}/packages/ --find-links ./packages --upgrade;Here we are running pip install with various options. The -r option specifies we will be using a file to source the list of requirements, in our case from requirements.txt. The--target option lets us specify to what directory we want to install the packages. We dynamically assign this path to be inside our Lambda function’s directory, in a packages subdirectory (pip creates this subdirectory automatically).
With the --find-links option we can specify a local path or url for where to look for the dependency packages it needs to install. In our case, we specify the path of our ./packages directory where the dinosaur package lives. Finally, the --upgrade option will cause pip to automatically install all specified packages to the newest available version, saving us time from having to delete our packages and reinstalling.
Now run the command for the create_dinosaur Lambda function:
make install-packages LAMBDA=create_dinosaur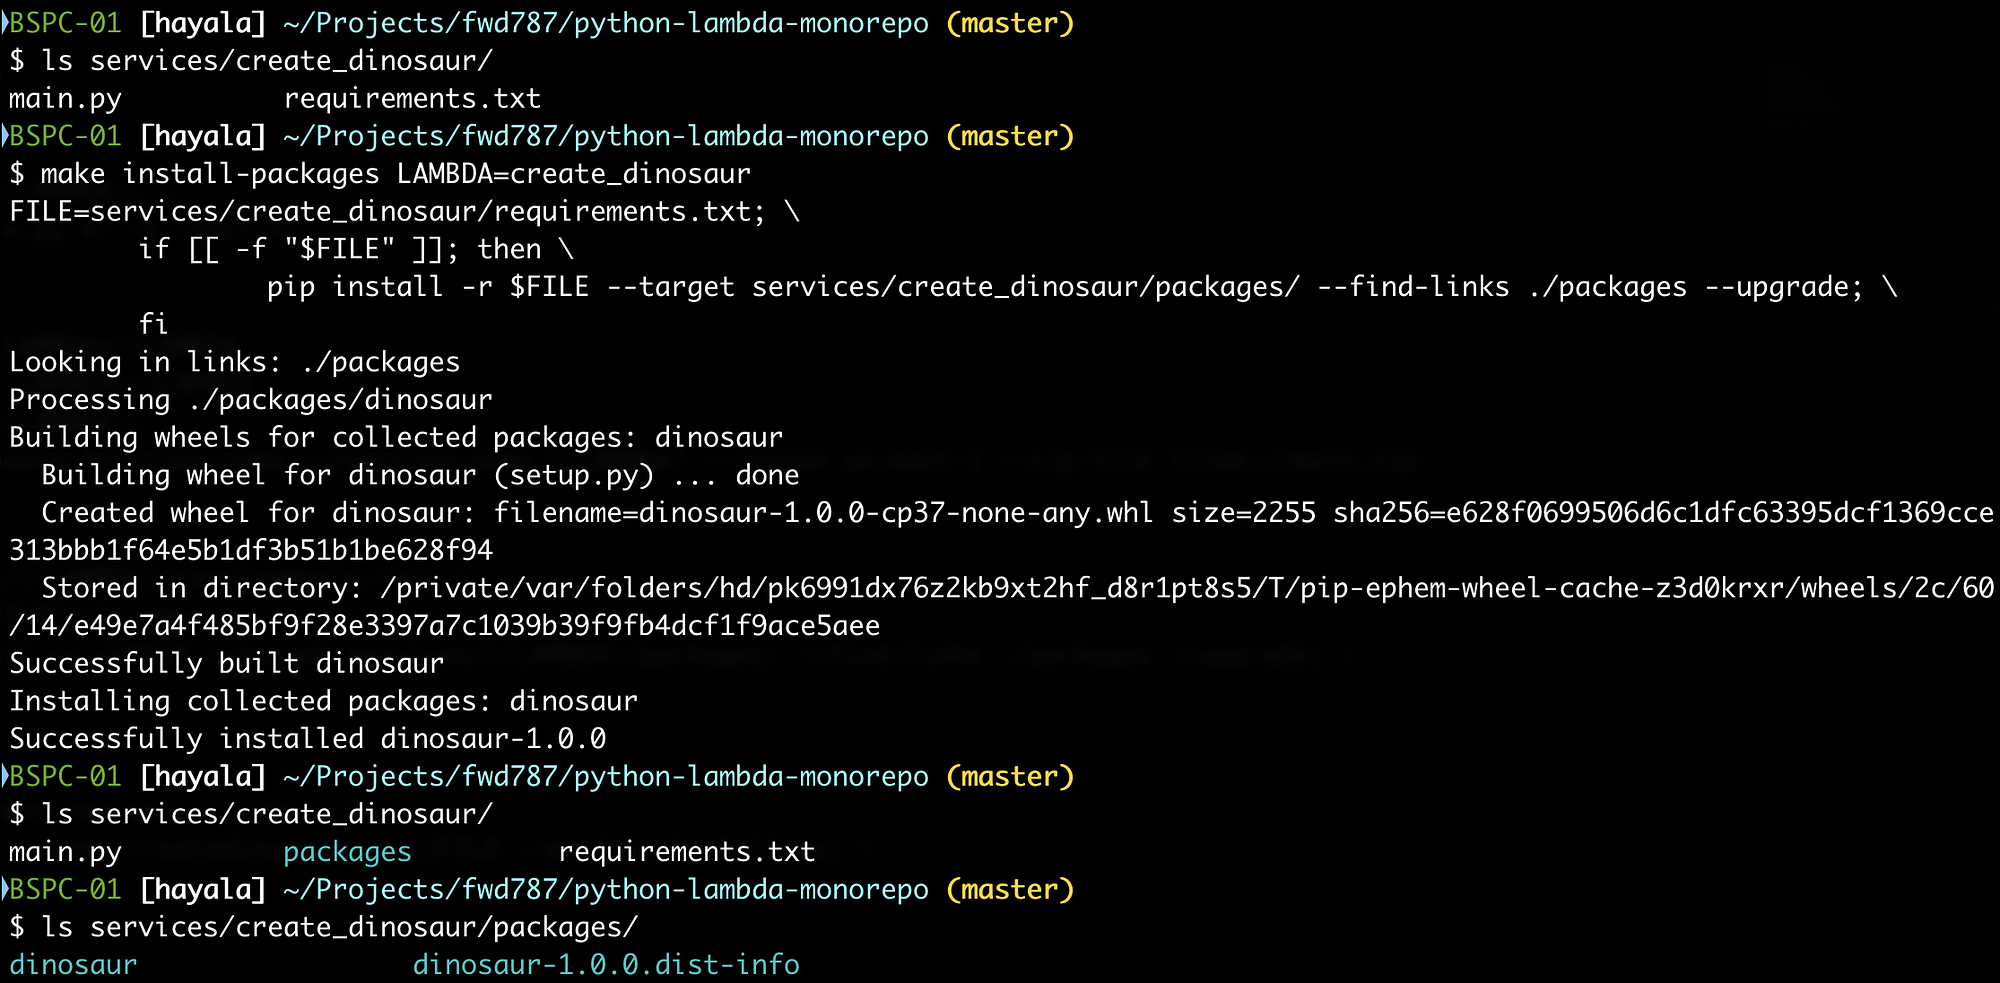
Our create_dinosaur function should now have these new files:
.
├── /packages
├── /services
|   ├── /create_dinosaur
|   |   ├── /packages
|   |   |   ├── /dinosaur
|   |   |   |   ├── /__pycache__
|   |   |   |   ├── __init__.py
|   |   |   |   └── core.py
|   |   |   └── /dinosaur-1.0.0.dist-info
|   |   ├── main.py
|   |   └── requirements.txt
|   ...
...
The Lambda function has the package installed! Run the command for each Lambda function and whenever you make changes to your packages so they get redistributed to your functions. To practice using make, I challenge you to create a new command that removes the packages directory inside all our Lambda function directories and another command that runs the install process for all Lambda functions (hint, you can use make commands inside other make commands).
In Part 3, we will test our code locally, build it, deploy it to AWS and run it in AWS. We’re almost done!